Resource

Channel Challenge!

Channel Challenge!

Student teams will be introduced to the phenomenon of how water can rapidly change the environment. They will observe how engineers reduce the impact of flooding events with materials that can absorb and channel water. At the end of this challenge students will be able to assess the ability of classroom materials to stop the movement of water. Student groups will devise and test a flood prevention system to stop water from reaching a castle, using 3D printed models.


Downloads:

Instructions for Teachers
Student Worksheet
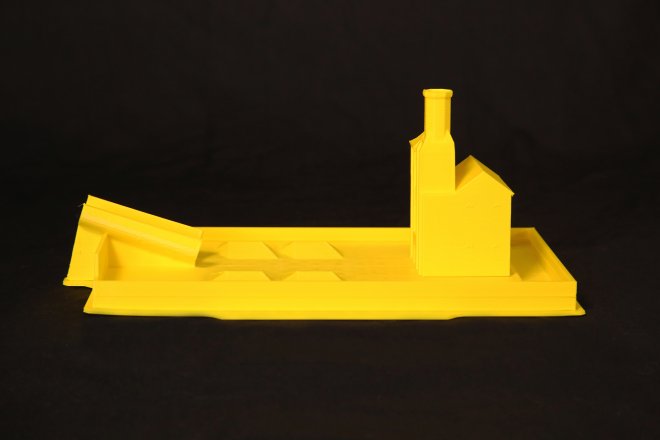
Channel Pan Model*
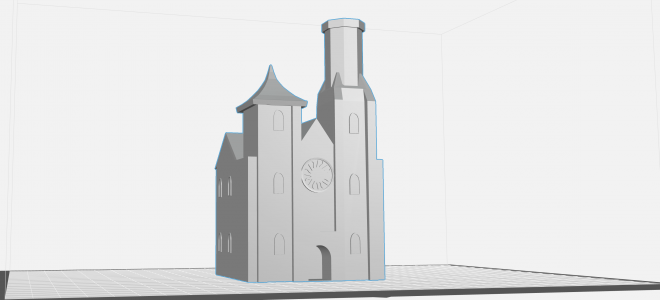
Smithsonian Castle Model*

*3D models can be viewed when imported into your 3D printer design software.

Available in Spanish

Download instructions for teachers

Download student worksheet

Spanish translations for the Smithsonian Science for Makerspaces challenges are made possible by a grant from the Smithsonian Women’s Committee.
 

Standards

Next Generation Science Standards

K-2-ETS1-1 Ask questions, make observations, and gather information about a situation people want to change, to define a simple problem that can be solved by developing a new or improved object or tool.

K-2-ETS1-3 Because there is always more than one possible solution to a problem, it is useful to compare and test designs.


Observe It!

Teacher will share the following passage with students

Machu Picchu was a city built long ago in a kingdom called the Inka Empire. The city was built in a challenging place, on top of a mountain in the middle of a jungle. It rains a lot in the jungle. The rain was very dangerous for the people of Machu Picchu because it could flood the buildings and cause the ground to move. But the people of Machu Picchu created a way to protect their city. Inkan engineers moved flood water away from the city using stone tubes. When we move water in this way, it is called channeling water. Inkan engineers also made terraces, which look like long steps made from dirt and rocks. The terraces absorbed the water and stopped the ground from moving when it got wet. The engineers of Machu Picchu were so good that you can still see their terraces and water channels today.

A view of Macchu Picchu ruins
Click here to open image in a new window


A close up view of Macchu Picchu ruin wallsYuelan/iStock/Getty Images Plus
Click here to open image in a new window


A view of Macchu Picchu terraced hillsidelovelypeace/iStock /Getty Images Plus
Click here to open image in a new window


Smithsonian Connections

To learn more about how the Inkas protected their cities from flood waters, visit The Great Inka Road: Engineering an Empire: https://americanindian.si.edu/inkaroad/

The Great Inka Road: Engineering an Empire is an exhibition of the Smithsonian National Museum of the American Indian.


Make It!

Makerspace Technology and Materials

  • 3D printer with filament
  • 3D printer design software
  • USB drive


Teacher will print off the Smithsonian Castle Pan and Smithsonian Castle for each student group

Click to download the Smithsonian Castle Pan model
Smithsonian Castle Pan dimensions: 10½ inches wide, 5¾ inches high

Click to download the Smithsonian Castle model
Smithsonian Castle dimensions: 2 inches wide, 3¾ inches high


Steps to Print

  1. Download the Smithsonian Castle Pan STL file.
  2. Download the Smithsonian Castle STL file.
  3. Open your 3D printer design software.
  4. Start a new project and Import the Smithsonian Castle Pan Model and the Smithsonian Castle Model.
    • Optional: Scale and Rotate the models as needed.
    • Optional: Apply printing supports as needed.
  5. Export and Open the project on your 3D printer. This may require a USB drive if your printer is not hooked up to your computer.
  6. Print the models.

Approximate about 12 hours of printing time.


Materials for Channel Challenge: sponge, tongue depressor, aquarium rocks, cotton balls, and water


Additional Materials for Each Student Group

  • 1 4-ounce cup
  • 1 medium container half full of water
  • 1 materials pack for each group containing
    • 1 Popsicle stick
    • 2 cotton balls
    • 1 small sponges
    • 1 4-ounce cups with 1 teaspoon of small rocks/gravel


Teacher Tip: Some students may want to substitute one material for two of another.  We recommend bringing extra materials so students can swap out materials.


Design It!

Students will be able to assess the ability of each material to block floodwaters from reaching the castle

Teacher will give each student a Channel Challenge worksheet


The Design It! stage is separated into two sections. In Part 1, students will assess each of the four materials: Popsicle sticks, cotton balls, sponges, and rocks or gravel. Students will record whether each material absorbs or channels water. They will assess how well each material stops water. In Part 2, students will plan a flood prevention system using the four materials. They will sketch out their plan and share it with their student group.


Design It! Part 1

  • Students will record the qualities of the four materials: Do they absorb or channel water?
  • Student groups will place one material onto the pan and test its efficacy by pouring a 4-ounce cup of water down the ramp.
  • Students will rate the material’s efficacy from 1 to 5 (where 1 is the best rating and 5 is the worst rating). How well did the material stop water?.


Design It! Part 2

  • Encourage students to start thinking about how they would combine the materials into a system that can best protect the castle.
  • Students can select up to four materials for their flood prevention system. Students do not need to select one of each material, but they should select at least one type of material that channels water and one type of material that absorbs water.
  • Students will sketch their flood prevention model on their worksheet.


Test It!

Student groups will devise and test a channel system based on prior observations

The Test It! stage is separated into two sections. Student groups will discuss and build one flood prevention system. In Part 1, student groups will record the results of the sets of materials they use in their system. They will record whether their system was successful or not. Students have space to record multiple attempts. In Part 2, the teacher will ask students what other materials might be used to absorb or channel water in their local community.


Test It! Part 1

  • Student groups will discuss their model ideas and work together to develop one flood prevention system, and will build it on the Castle Pan model. The system can use up to four materials. There must be at least one material that can channel water and one that can absorb water.
  • Group members will record their predictions about whether their system will work or not. Teachers will ask students for specific reasons why think their system will or will not work.
  • Students will pour 1/4 cup of water down the ramp on the Castle Pan model. Students will record whether their system was successful in protecting the castle.
  • Teacher will ask students, “How can your systems be improved?”
  • Students can adjust their systems and try to save the castle in a second attempt. Students will record their predictions and the results.


Test It! Part 2

  • Teacher will ask students to list other items that can absorb or channel water. What materials might work in real life to protect buildings in their community? After students have listed a few examples of other materials, they will share their thoughts with the class.


Assessment Questions

What materials absorbed the water well?


What materials channeled the water well?


To prevent flood waters from reaching a building, what materials would you use to protect the building? Would those materials absorb water or channel water?